Preparing Heirloom Lace & Washable Glue Trick by Hope Yoder
Many of you know that I travel across the I don’t normally visit chat rooms or sewing forums but a friend of mine mentioned that there was a lot of discussion about me on the Martha Pullen forum. I was curious so I searched the website and found several comments regarding my embroidery designs as well as some questions from Gayle who was trying to recreate my the blue batiste blouse project that I wrote for Feb 2007 Sew News magazine. I read the comments from the forum members trying to help her. Needless to say she received many different answers so I e-mailed her directly. Below I’ll share part of our e-mails as she thought others might find this helpful as well. Gayle was having trouble getting her heirloom cotton lace attached to the batiste fabric because she had wet the lace prior to insertion. Below is a small excerpt from the article. | ||
Excerpt from the Magazine Article | ||
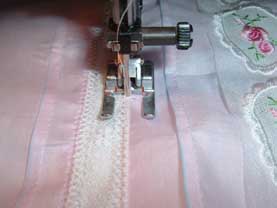
Pin the heirloom insertion lace along each line and lightly spray with starch. Use a 110 universal needle or a 100 Wing needle, 60 weight cotton thread and select an Entredeux or a Pinstitch to attach the lace. Place light weight tearaway underneath the fabric & attatch the lace to the base fabric. |
| |
Gayle: I think my mistake was in wetting (with water) the lace in the first place. The edges curled and I couldn't get them flat again without stretching the lace. So, after removing the lace from the blouse front, I pinned it to my lace shaping board with glass head pins, and, as you suggested, sprayed it with starch, pressed it dry, and started over. The edges weren't perfectly "uncurled" but much better. I aligned the edge of the lace with the line I had drawn with the blue wash-out pen (per the instructions), then stitched it… Hope: I normally starch my lace well and let it air dry before I use it. But I DO NOT iron the wet starched lace. | ||
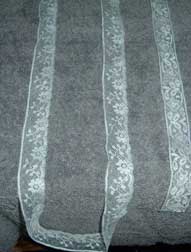
| I place a bath towel on my ironing board and lay the lace on the towel (you can make a loose wad of lace on the board) and then heavily spray the lace with starch. By heavily starching it I mean just make it slightly wet. | |
| Now take the lace and drape it over the ironing board so it isn’t wrinkled at all and let it air dry. If you have too much yardage of lace you can sling it over your shower curtain.
Once it’s dry then you can use it as described in the magazine instructions. | |
Use glass head pins to pin the lace to the fabric, stabbing the pins into a padded surface like a lace shaping board. Then I lightly starch the lace that is pinned down & press it dry so the lace slightly sticks to the shirt front. Make sure your iron is clean and use an up and down motion with the iron.
Another good trick if you are not going to cut the base fabric behind the lace - you can glue the lace down. This is a good beginner trick which I still use. Use Elmer's blue washable glue (a thin bead). Place the glue along the center of the lace or just inside the lace headings and let air dry. I never can wait for it to air dry so I place a cheap paper towel over the glued lace and press it dry with the iron. Remember this trick will only work if you aren't going to cut the fabric from behind the lace. | ||
Monday, May 11, 2009
Preparing Lace - & Washable Glue Trick


Subscribe to:
Post Comments (Atom)
No comments:
Post a Comment